Official Luthiers Forum!
http://www-.luthiersforum.com/forum/

Stupid mistakes. - and much needed help!
http://www-.luthiersforum.com/forum/viewtopic.php?f=10102&t=10169
Page 1 of 2

Author:  Steve Saville [ Thu Jan 04, 2007 3:45 am ]
Post subject: 

I thought it might be nice to share our most recent stupid mistakes so that we all don't feel so, um, well, stupid.      
I'm not sure it will work. It could just confirm our suspicion!
Please participate by sharing your mistake(s) and/or offering help to fix these mistakes.


OK - I'll get us started!
I just drilled through the X brace while installing an LR Baggs Active Element in a recently completed OLF SJ. Yep, I drilled through the whole thing, just on the inside edge and it broke through the edge all the way to the top of the brace.
What should I do? I was thinking of laminating a piece of sitka about 2" long and about .027 thick across the hole.

Author:  LanceK [ Thu Jan 04, 2007 3:57 am ]
Post subject: 

Replace the top, I really don't see any other option.

I once drilled the fretmarkers one fret off
To this day I blame my kids!

Author:  JJ Donohue [ Thu Jan 04, 2007 4:07 am ]
Post subject: 

Steve...bummer! As an engineer, I'm sure you realize what effect this will have on the beam strength and I don't think it's good. The lam should help but for how long is the question. If this is a personal guitar then just live with it and hope that the structure doesn't collapse. If it's a commission then I know you'll do the right thing. I'm sure our resident repair expert, David Collins, will have the definitive answer on what to do.

As far as my most recent mistake, it's the guitar drop and almost catastrophic back crack along with Brace #4! While I was only able to make an invisible repair with David's help I'll always know where the internal scars reside. Fortunately, it's a personal guitar and just another psychologically traumatic learning experience.

My biggest area for improvement is to produce uniform and gap-free bindings. My escape plans always include time-consuming filling and concealing. Other mistakes are too numerous to mention but not forgotten!

Hang in there, dude...and don't panic!

Author:  TonyKarol [ Thu Jan 04, 2007 4:16 am ]
Post subject: 

Probably happened during a leap year Lance ....

Author:  LanceK [ Thu Jan 04, 2007 4:17 am ]
Post subject: 

[QUOTE=TonyKarol] Probably happened during a leap year Lance ....[/QUOTE]

Author:  Steve Saville [ Thu Jan 04, 2007 4:47 am ]
Post subject: 

[QUOTE=LanceK] Replace the top, I really don't see any other option.
[/QUOTE] I was afraid of that.
I built this guitar for the son of a very good friend. I build it for the cost of the wood. That is why I'm thinking of trying a lamination. I can replace the top in a couple of years if it doesn't hold, but if it does.....
That area is fairly strong with the bridge and bridge plate laminated right there. I think a laminated piece spanning the hole with a couple of inches extra would hold.
Please do let me know if that's just a bad idea. Has anyone tried that?

Author:  LanceK [ Thu Jan 04, 2007 4:55 am ]
Post subject: 

Steve that is a tough call, on one hand its not a full on commission, on the other, do you really want a guitar out there bearing your name, imploding?

Tough call my friend.

Author:  Bruce Dickey [ Thu Jan 04, 2007 5:00 am ]
Post subject: 

[QUOTE=SteveS]   I was afraid of that.
I built this guitar for the son of a very good friend. I build it for the cost of the wood. [/QUOTE]

Steve, splice the brace with a slip hide glue repair. It will work fine. Throwing away this top is silly, not to mention all the other work that goes along with it. If it is for a good friend, he will appreciate the fact that you solved this problem with little trouble. Sounds like it's near ready for delivery.

It would be different if it were a $3750 commission. That is completely a different situation. Congratulations on your fearless post.Bruce Dickey39086.5461921296

Author:  Bruce Dickey [ Thu Jan 04, 2007 5:07 am ]
Post subject: 

How about some pictures of the guitar?

Author:  Serge Poirier [ Thu Jan 04, 2007 5:09 am ]
Post subject: 

Sorry to hear about your misfortune Steve, i'm sure you'll do the right thing, tough call, listen to your inner voice of wisdom bro!

Author:  Wade Sylvester [ Thu Jan 04, 2007 5:10 am ]
Post subject: 

I'll side with your lamination fix Steve.
In this case, replacing the whole top seems a bit drastic.
Also, I'd think about making a plug out of hardwood a bit less diam than your drill size and epoxy fill the hole as well.
It's not perfect but will work for now, as you say.

I have bent a set of sides upside down and backwards, for a cutaway. Talk about dyslexic!

Wade

Author:  Steve Saville [ Thu Jan 04, 2007 5:16 am ]
Post subject: 

[QUOTE=Bruce Dickey] How about some pictures of the guitar?[/QUOTE]
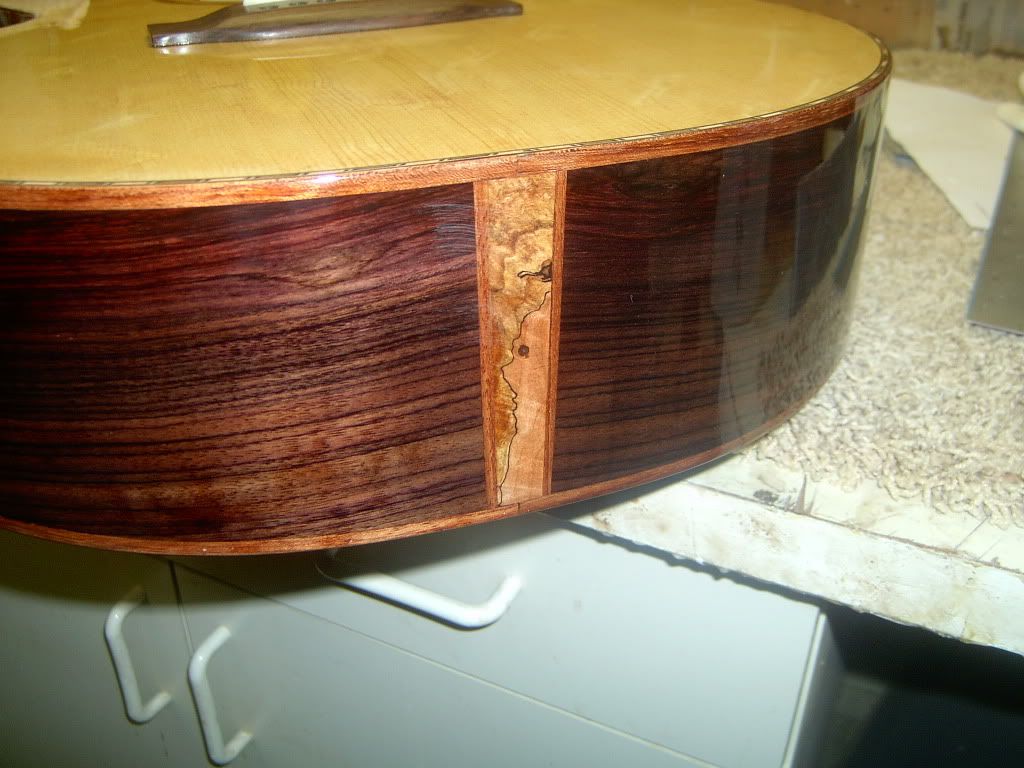
I don't have many pictures to post yet. Just this one with some wax that looks like scratches.
Bearclaw sitka on EI rosewood with bubinga bindings and some spalted maple - CrystaLac water based finish.


Author:  af_one [ Thu Jan 04, 2007 5:21 am ]
Post subject: 

Several times my ladder braces on the back have slipped on Go Bar. Chiseling, sanding and making and replacing new braces drives me crazy. each time I swear I will build a spacer of some sort to prevent this--I never seem to learn though.

Author:  Sam Price [ Thu Jan 04, 2007 5:26 am ]
Post subject: 

Sooooo....where would you like me to start, Steve?


Author:  Steve Saville [ Thu Jan 04, 2007 5:28 am ]
Post subject: 

[QUOTE=Sam Price] Sooooo....where would you like me to start, Steve?

[/QUOTE] Either the most recent, or worst mistake. I did the most recent, and worst.   

Author:  Sam Price [ Thu Jan 04, 2007 6:24 am ]
Post subject: 

[QUOTE=SteveS] Either the most recent, or worst mistake. I did the most recent, and worst.   
[/QUOTE]

Right then..

According to the Cumpiano book, one must make a heelblock 3x3x4 nuff said, easily done, glued onto neck blank as per instructions.

NOw the head block should be 3 and 1/8ths inches high, and the sides tapered down to meet that height.

The heel block is at least an INCH too tall!! (being 4 inches)

Uh, I think that'll do for now...dunce cap on.

Author:  Tom Armstrong [ Thu Jan 04, 2007 6:34 am ]
Post subject: 

There's not enough room on the forum to post all my blunders. The good news is that I only made the same mistake one time....I'm getting better.

Author:  Steve Saville [ Thu Jan 04, 2007 6:47 am ]
Post subject: 

[QUOTE=Gasawdust] ...... The good news is that I only made the same mistake one time....[/QUOTE] I hope to be able to say that. Somehow, I doubt that I will......

Author:  Bruce Dickey [ Thu Jan 04, 2007 7:00 am ]
Post subject: 

Todd brings up good engineering practices which come from experience I'm sure.

Steve, why not replicate the repair on a scrap brace? That way, you know the repair you make is a repair you can live with long term.

Drill down through your test brace, patch it with a patch like the one you'll have to make inside this guitar. Then, after it sets up, say 24 hours, test this brace against another brace for a control test.

Just an idea. Again, thanks for the fearless post and we applaud your efforts.   

Author:  Kirt Myers [ Thu Jan 04, 2007 7:46 am ]
Post subject: 

Seems like if your patch is at least the same thickness as the diameter of the hole you drilled, you would be replacing as many fibers as you drilled away. Just as long as your patch is long enough on either side of the "boo boo" to get a good continuous bond.

My $.02... Good luck.

On the one and only dred I built, I cut the x braces too short so that they ended shy of the linings instead of being tucked under them. Just didn't know any better. so I scarfed little extensions on both ends of each brace. Nobody knows so don't tell.

I haven't been building long so I'm sure I've got some real doosies coming.

Kirt

Author:  Rod True [ Thu Jan 04, 2007 7:46 am ]
Post subject: 

I think you have been given good advise already regarding the repair.

Personally, I would probably plug the hole with a dowel, than "box in" around the brace where the hole is than sand most of the boxing off to leave a relativly thin veneer overtop of the brace area. This would be a lot of work, but maybe not as much as replacing the top.

The other thing to do would be to pull the back (usually less problems this way) and repair the brace from the inside.

Ok my latest mistake was a doozy, I posted it when it happened here but this is the jest of it.

Well, looking at the bending form post is interesting to me (especially Richard's SJ L-OO bending form similarity) as I realized that I did something very dumb the other day.

As some of you know, I'm working on a maple/cedar guitar which I've bent the sides in my new side bender, which was compensated for the OM/OOO body size.

So, I've put together the sides, head and tail blocks, linings and was starting to layout the top bracing. I placed the top down than the assembled rim in the mold on top and by gosh, there was about a 1/4" gap at the tail end what happened.

Well, I take a second and third look at the sides and the top, thinking I cut the top to small but I measured it and it was fine......

Well, I assembled the rims in the wrong mold. I used my Grand Auditorium size mold. Dohhhh!!!!!!!!!

Well, after thinking about throwing the thing across the room, I stopped to think what I would do.

Well, I got out the iron and heated the side over the tail block till the glue softened and I worked the thin blade knife in between the side and block and separated the sides from both the tail and head block. Cleaned up the blocks so they were ready to go.

Now I put the sides into the OM/OOO mold and wouldn't you know it, they fit perfectly, even though I had the linings installed (regular, triangular linings). So I trimmed the ends to the correct length, trimmed back the linings to fit the head and tail block and glued in the blocks.

I sure was wondering why the tail ends were so close to the end joint when I didn't cut them to length before hand.

Well, now I have the molds clearly labeled and I'm sure this won't happen again (knock on wood).

What a bone head     

Pictures to come later tonight.

Author:  Rod True [ Thu Jan 04, 2007 7:48 am ]
Post subject: 

[QUOTE=Kirt] On the one and only dred I built, I cut the x braces too short so that they ended shy of the linings instead of being tucked under them. Just didn't know any better. so I scarfed little extensions on both ends of each brace. Nobody knows so don't tell.

Kirt[/QUOTE]

Kirt, I just finished closing up my 5th and purposly didn't tuck the braces under the linings. There are many many Gibson's out there that don't have the braces tucked and many builders here don't tuck either.

I think you'll be just fine.

Author:  Kirt Myers [ Thu Jan 04, 2007 7:58 am ]
Post subject: 

Yep Rod, I've seen some like that since doing that. Not nearly as much stress out there at the ends as there is near the center.

I also inlet the finger braces and bridge patch into the x braces, and now I know that's not necessary. Makes replacing the bridge patch easier.

Kirt

Author:  JBreault [ Thu Jan 04, 2007 8:31 am ]
Post subject: 

Bummer Steve. Here's my atest boneheaded mistake... Recently while making a neck (I will note this was my first attempt from scratch), I cut the heel of the neck short. I swear I measured to the 14th fret and gave myself some extra wiggle room...Well, I have a 12 fret neck waiting for a project now.

Author:  Bruce Dickey [ Thu Jan 04, 2007 8:43 am ]
Post subject: 

Sand don't scrape.

On my brothers GA, I noticed two hairs from my arm embedded into the dry lacquer. I whipped out my pocket knife and scraped until they released. Even four coats of lacquer isn't close to completely filling the low spots.

From now on I sand out lacquer imperfections, instead of scraping, which makes the repair of the spot much more difficult.

Page 1 of 2 All times are UTC - 5 hours
Powered by phpBB® Forum Software © phpBB Group
http://www.phpbb.com/